How to Configure IPSec VPN on your firewall
Document Dated: 28th September 2022
GajShield Firmware Version: 4.5 and above
This page helps you to configure IPSec VPN using pre-shared key.
The following steps need to be followed to configure Site to Site VPN using pre shared key.
- Creation of Policy
- Creation of Tunnel
- Required to add Rules
- Restart VPN Service
Creation of IPSec Policy
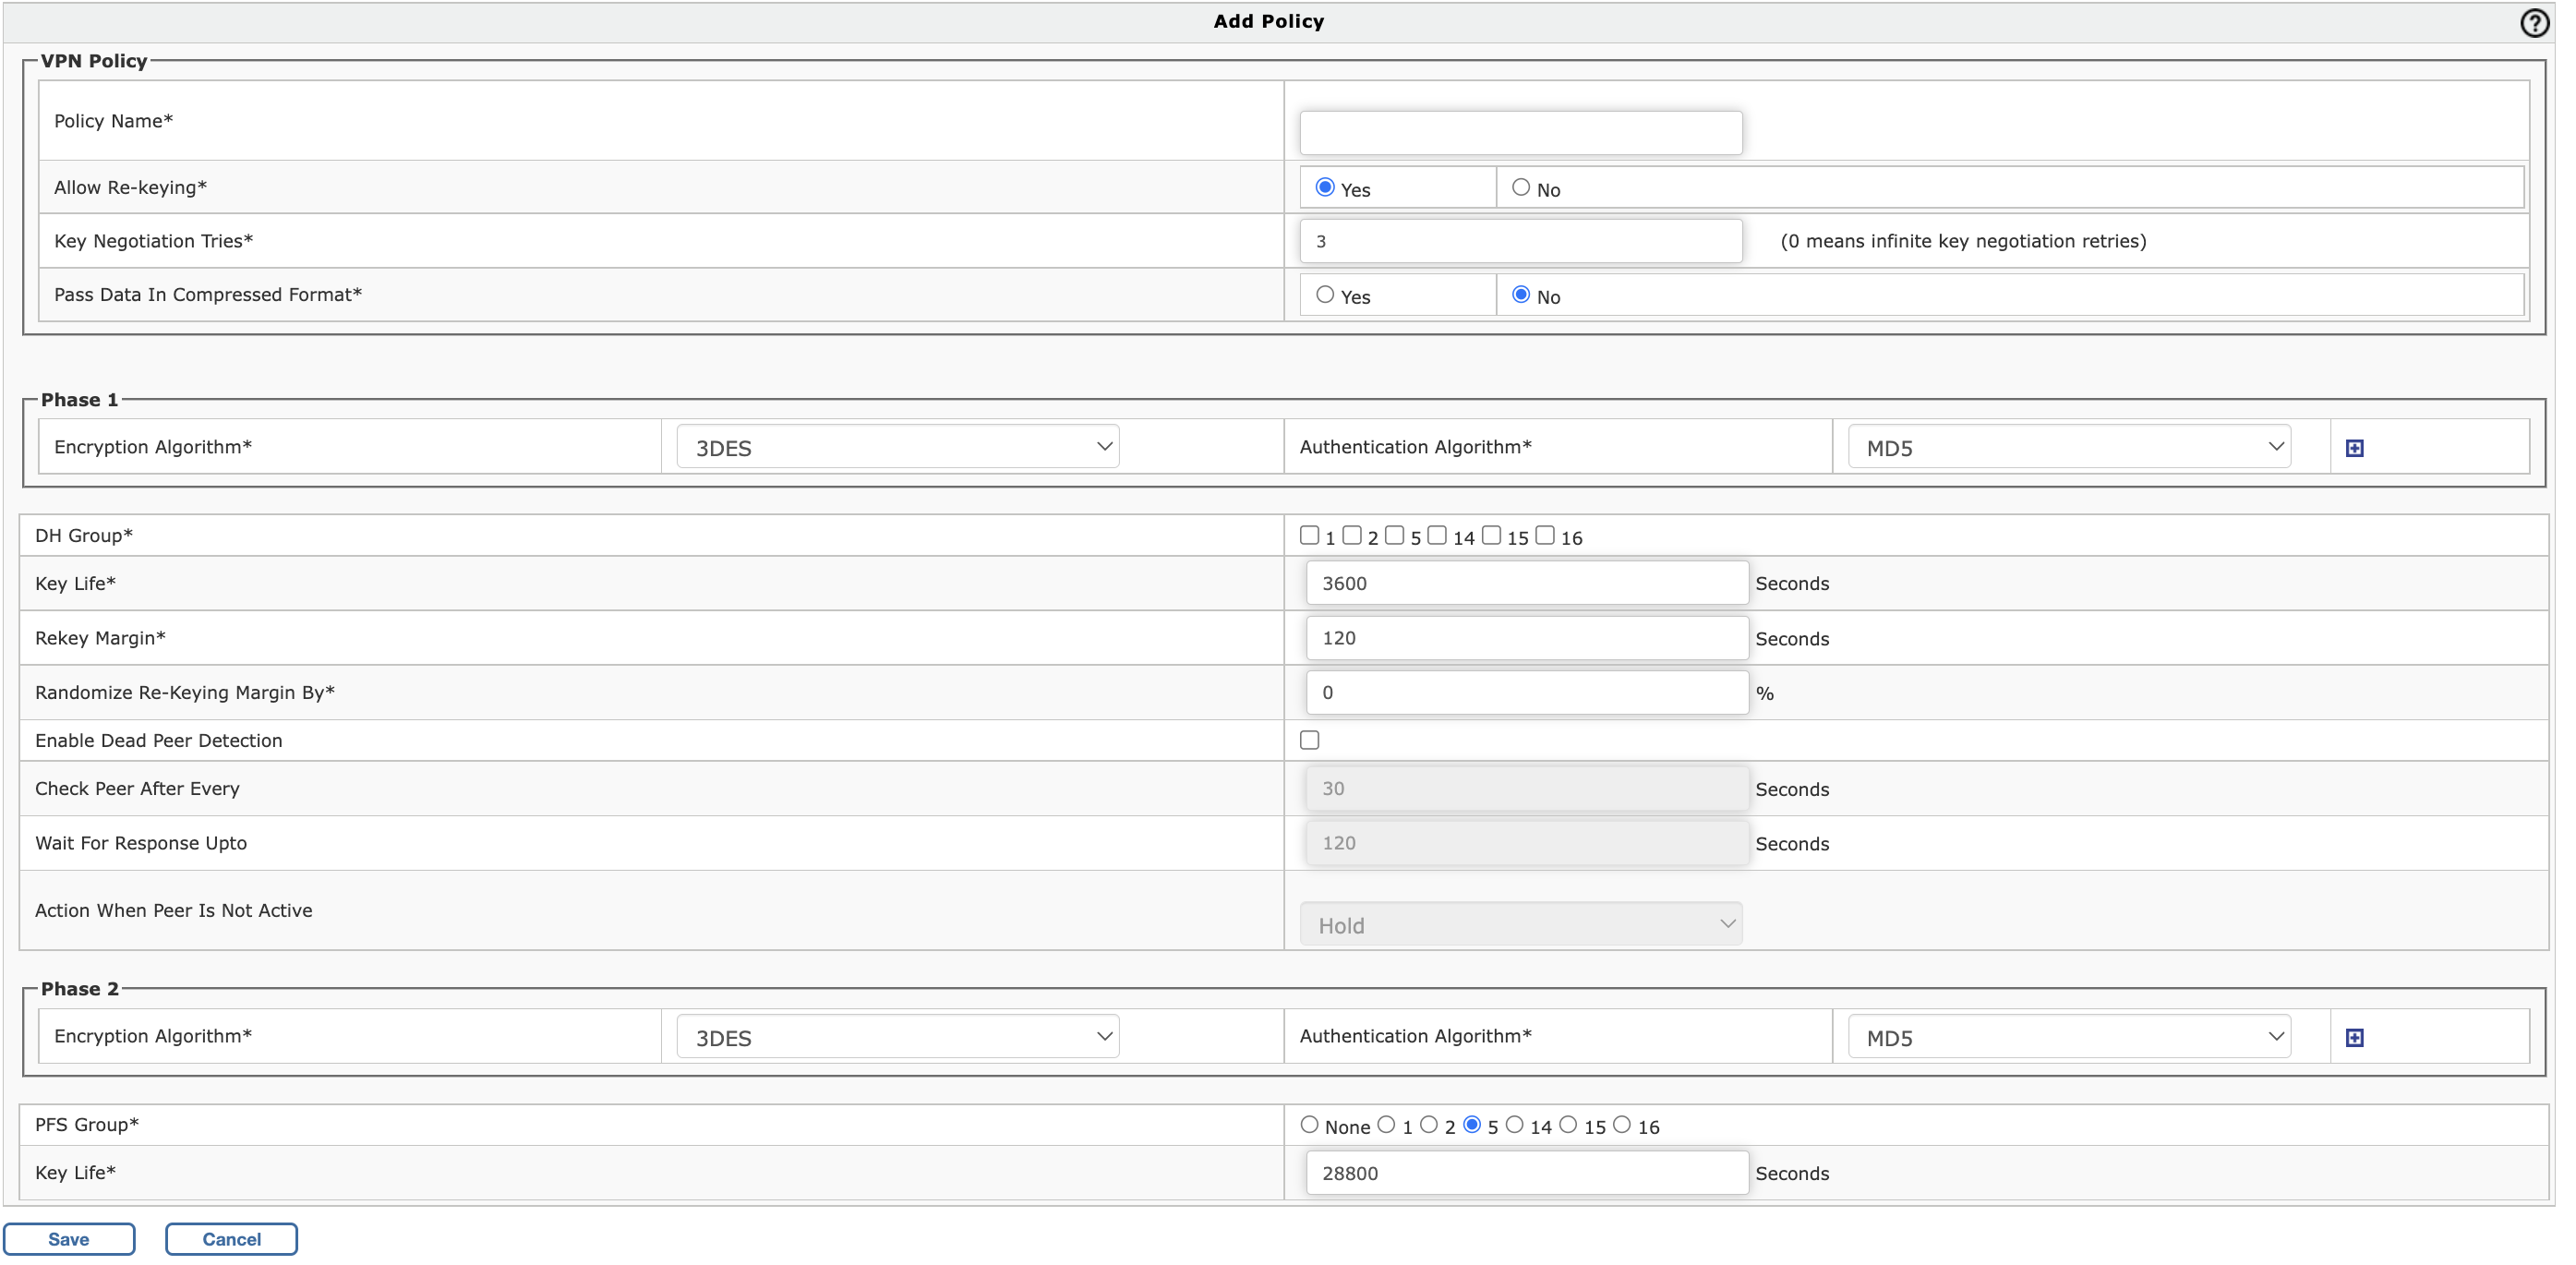
To create an IPSec Policy, Go to VPN > IPSec > Policy and click on + (Add)
- Policy Name:
Specify a name to identify the policy
- Allow Re-keying:
Enable Re-Keying to start the negotiation process automatically before key expiry. New SAs would be created which replace the old SAs, well before they expire
-
Key Negotiation Tries:
Specify maximum key negotiation trials allowed. Set 0 for unlimited number of trials.
- Pass Data In Compressed Format: Enable compression of data to increase throughput
Enter Phase 1 Details
- Encryption Algorithm:
Select encryption algorithm that would be used by each end of the tunnel during phase 1.Supported Encryption algorithms: 3DES, AES128, AES192, AES256, TwoFish, BlowFish-128, BlowFish-256, and Serpent.
- Authentication Algorithm:
Select authentication algorithm that would be used by each end of the tunnel during phase 1. Supported Encryption algorithms: MD5, SHA1 and SHA2
- DH Group:
Select the Diffie-Hellman group from 1, 2, 5, 14, 15, 16
-
DH Group 1 uses 768-bit encryption
-
DH Group 2 uses 1024-bit encryption
-
DH Group 5 uses 1536-bit encryption
-
DH Group 14 uses 2048-bit encryption
-
DH Group 15 uses 3072-bit encryption
-
DH Group 16 uses 4096-bit encryption
-
- Key Life:
It is the amount of time before a key expires. Default is 3600 seconds
- Rekey Margin:
How long before connection expiry or keying-channel expiry should attempts to negotiate a replacement begin. Default is 120 seconds.For example: If the Key life is 1 hour and rekey margin is 60 seconds, the renegotiation process will begin at 59 minutes.
- Randomize Re-Keying Margin By:
Specify Randomize Re-Keying time
- Enable Dead Peer Detection:
If enabled, it will check if the remote end is alive or not
- Check Peer After Every:
Defines the period time interval to check if peer is alive. These are only sent if no other traffic is received.
- Wait For Response Upto:
Defines the timeout interval, after which all connections to a peer are deleted in case of inactivityHold: Holds the connectionClear: Closes the connectionRestart: Re-establishes the connection
Enter Phase 2 Details
- Encryption Algorithm:
Select encryption algorithm that would be used by each end of the tunnel during phase 1.Supported Encryption algorithms: 3DES, AES128, AES192, AES256, TwoFish, BlowFish-128, BlowFish-256, and Serpent.
- Authentication Algorithm:
Select authentication algorithm that would be used by each end of the tunnel during phase 1. Supported Encryption algorithms: MD5, SHA1 and SHA2
- PFS Group (DH Group):
Select the Diffie-Hellman group from 0,1, 2, 5, 14, 15, 16
-
DH Group 0 means non encryption. You would want to use it for performance only with no encryption
- DH Group 1 uses 768-bit encryption
- DH Group 2 uses 1024-bit encryption
- DH Group 5 uses 1536-bit encryption
- DH Group 14 uses 2048-bit encryption
- DH Group 15 uses 3072-bit encryption
- DH Group 16 uses 4096-bit encryption
-
- Key Life:
It is the amount of time before a key expires. Default is 3600 seconds
Click 'Save' to add the IPSec policy
Creation of IPSec Tunnel
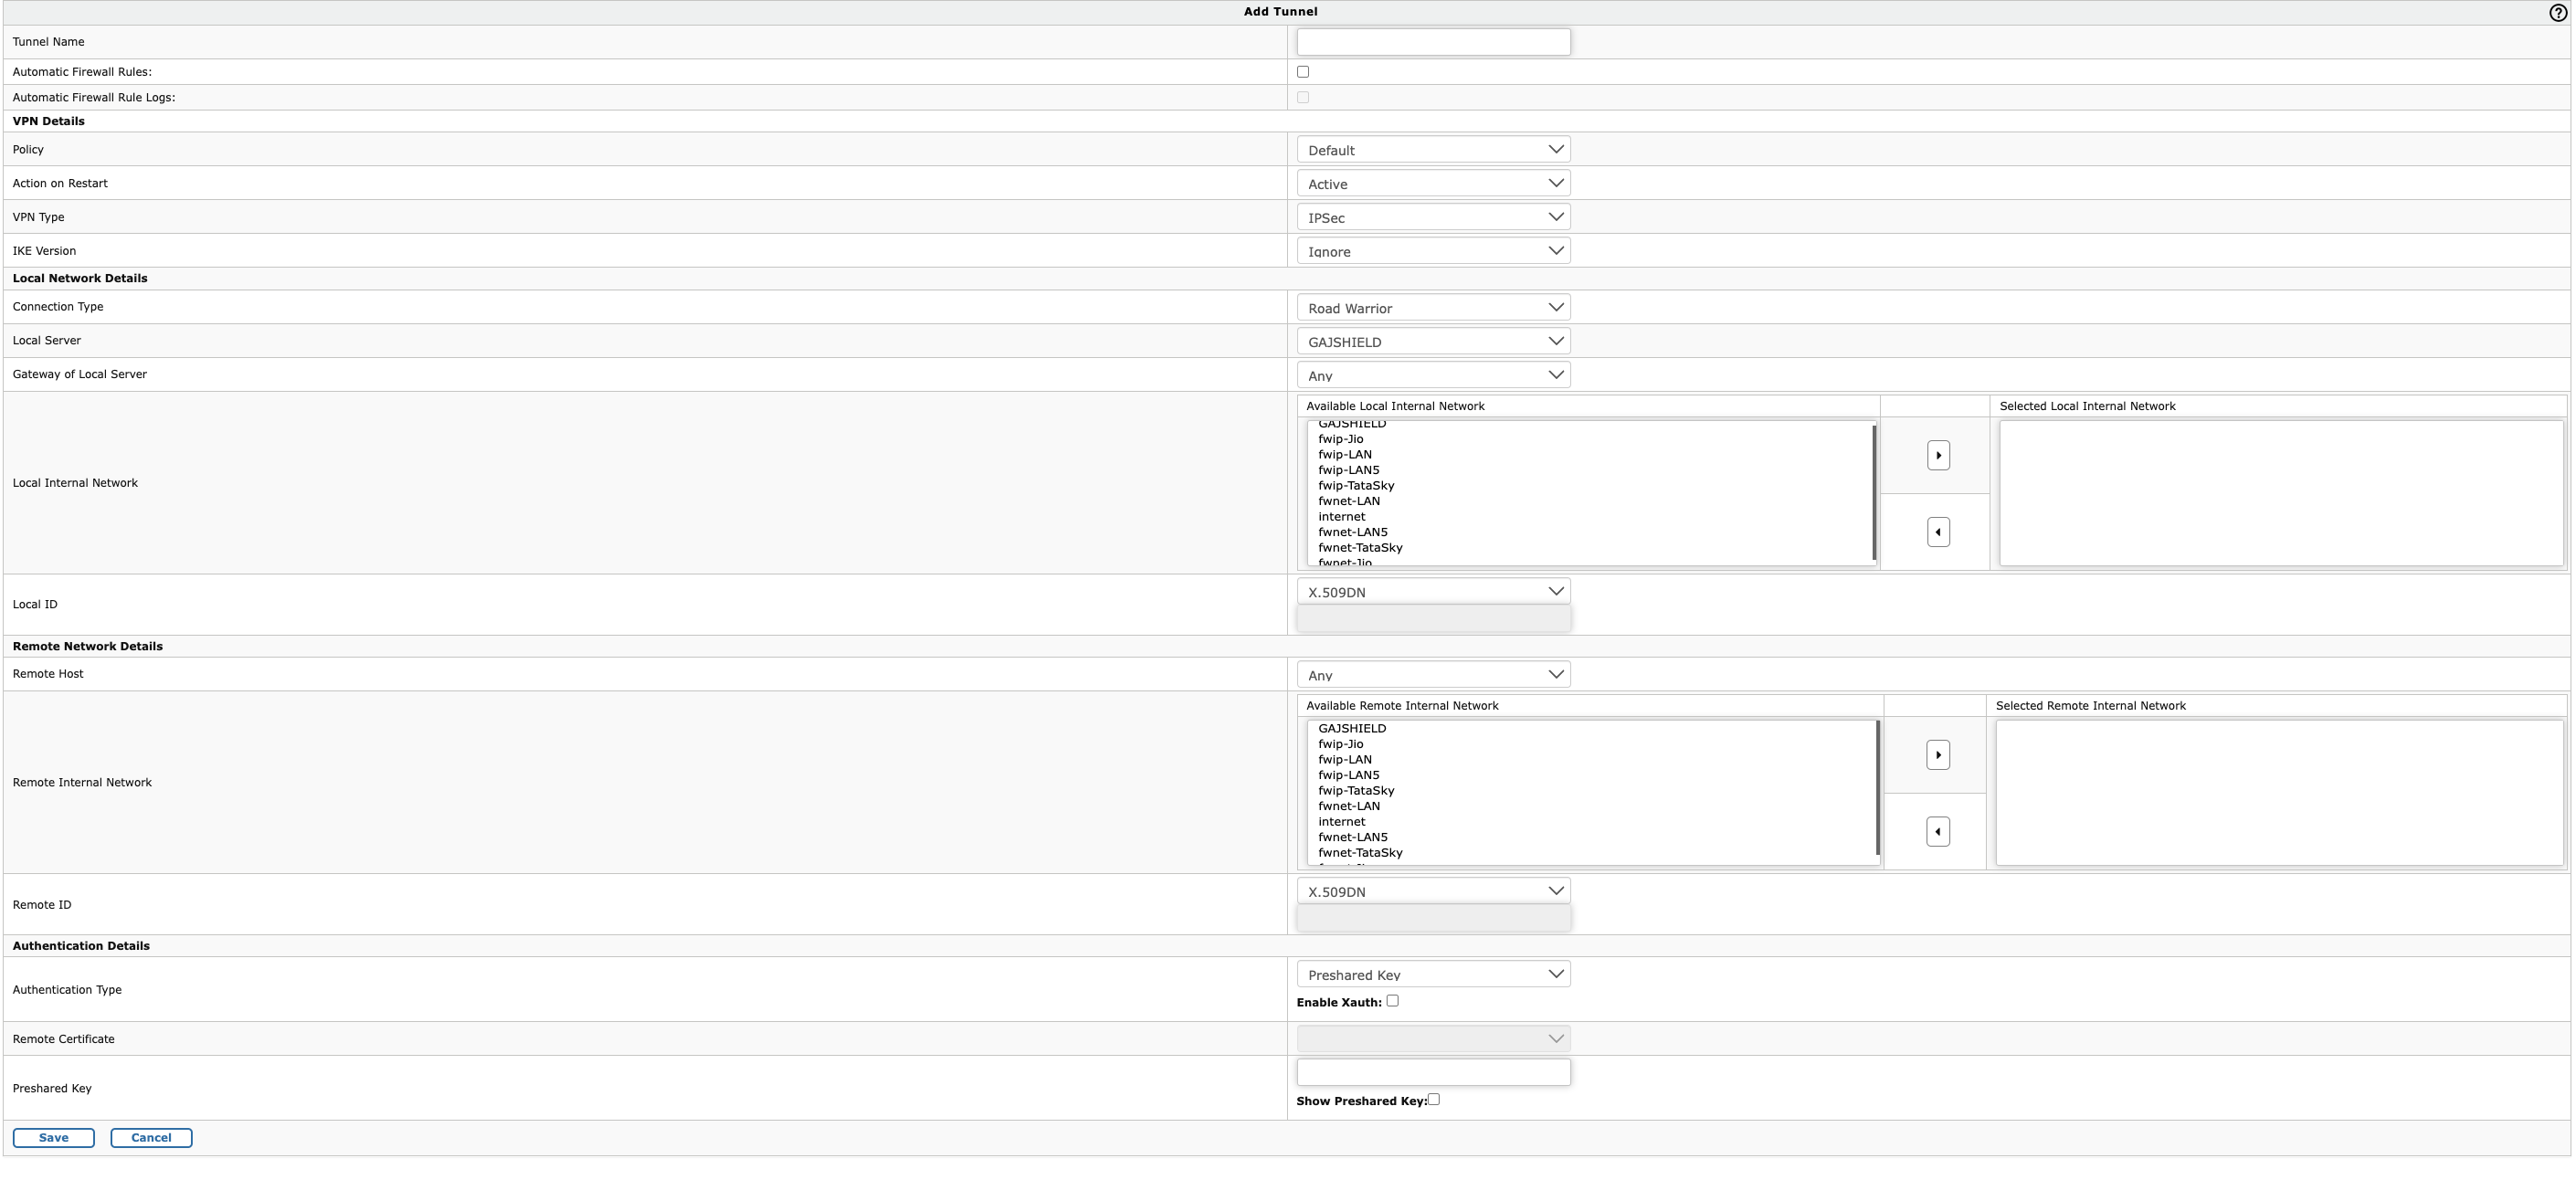
To create an IPSec Tunnel, Go to VPN > IPSec > Tunnel and click on + (Add)
- Tunnel Name: Specify a name to identify with the tunnel
- Automatic Firewall Rules: Do not select this, if you wish to manually create the firewall rules.
- Automatic Firewall Rule Logs: Select this if you wish to enable firewall logs for the traffic through this tunnel. This option is only available, if the Automatic Firewall Rules is selected
Enter VPN Details
- Policy: Select the policy that you have created based on the above steps​
- Action on Restart: This has the following options
- Active: Activates the connection on start so that it can connect to the remote peer
- Passive: It responds to any incoming connection
- FailOver: Tunnel will be used in a failover mode
- VPN Type: The options are IPSec and L2TP. Since we are configuring a site-to-site VPN with Pre-Shared key, select 'IPSec'
- IKE Version: The options are 'Ikev1' and 'Ikev2'. Select 'Ikev2' for the site-site connection
Enter Local Network Details
- Connection Type: This has three options Road Warrior, Host to Host and Net to Net. Since two networks are connected, select 'Net to Net'
- Local Server: IP address of the firewall external interface which will be used to connect to peer
- Gateway of Local Server: The default gateway or the next hop router IP connected to the firewall external interface
- Local Internal Network: the local network to which remote peer will connect
- Local ID: This has four options X.509DN, FQDN, IP address and Email address. Since the connection will use pre-shared key, use any one of the option to identify the tunnel
Enter Remote Network Details
- Remote Host: IP address of the peer to which the VPN will be connected
- Remote Internal Network: the remote network to which you would like to connect from your local network
- Remote ID: This has four options X.509DN, FQDN, IP address and Email address.
Authentication Details
- Authentication Type: Select 'Preshared Key' here
- Remote Certificate: Will be disabled since preshared key is selected
- Preshared key: Provide the preshared key which is shared between peers and used to encrypt and decrypt the traffic
Click 'Save' to add the IPSec tunnel
Thus we have successfully created IPSec Site-to-Site VPN with Pre-shared key on GajShield Firewall

