How to configure DHCP server on your firewall
Firmware Version: 4.5+
Discover how to set up and configure DHCP settings on your GajShield firewall with our comprehensive step-by-step guide. DHCP (Dynamic Host Configuration Protocol) automates the process of assigning IP addresses to devices on your network, simplifying network management and ensuring efficient connectivity. Follow along as we walk you through the configuration process, from logging in to your firewall to verifying DHCP lease assignments. Don't miss out – watch now and streamline your network configuration with ease!
The following steps need to be followed to configure DHCP server on your firewall. Go to Configuration -> DHCP Server Config. The following screen will appear.

Here you can:
- View all IPv4 and IPv6 DHCP configurations,
- Add new IPv4 and IPv6 DHCP configuration,
- Edit an existing IPv4 and IPv6 DHCP configuration,
- Delete an existing IPv4 and IPv6 DHCP configuration.
NOTE: You can configure multiple DHCP/DHCPv6 configuration for same interface with different range of IP addresses
NOTE: You can configure multiple DHCP/DHCPv6 server configuration for different interfaces.
- To add DHCP Server click on
 button.
 - To edit DHCP Server click on
 button.
 - To delete DHCP Server click on
 button

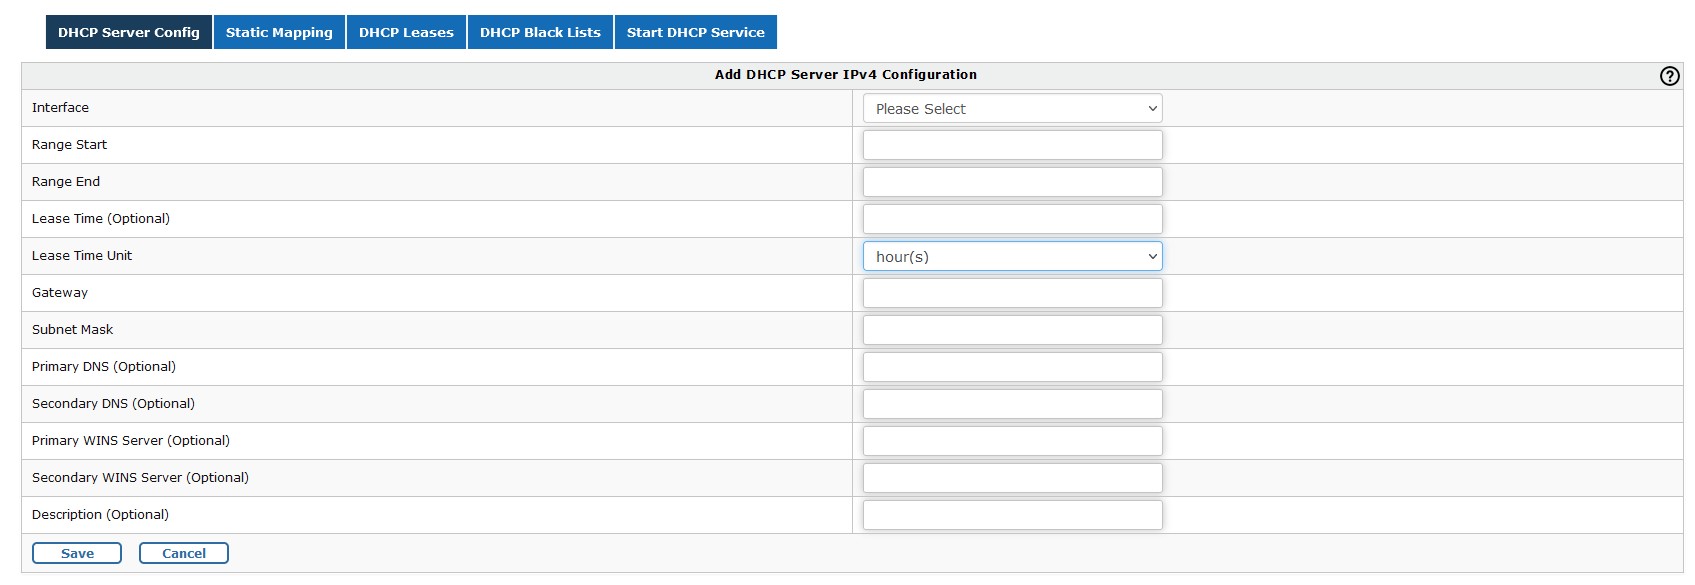
The following information is required:
Interface: Interface on which IPv4 DHCP server is to be configured.
Lease Range: Range of IP addresses that the DHCP server should allocate to the clients.
- Range Start: Start of lease IP range.
- Range End: End of lease IP range.
Lease Time (Optional): The duration of the lease of the IP addresses.
Gateway: IP address of the router (default gateway) that the clients should use to communicate with clients on other subnets.
Subnet Mask: Subnet mask to be used by DHCP server to identify whether the IP address to assign belongs to the subnet.
DNS (Optional): IP address of the DNS server that the clients should use to resolve domain names.
- Primary DNS (Optional): Primary DNS.
- Secondary DNS (Optional): Secondary DNS.
WINS (Optional): IP address of the WINS server that clients should communicate with to register and resolve NetBIOS names.
- Primary WINS (Optional): Primary WINS.
- Secondary WINS (Optional): Secondary WINS.
Once your changes are done, you need to start DHCP Service from Configuration -> DHCP Server -> Start DHCP Service to reflect the changes.

The following information is needed to set up DHCP Server IPv6 configuration

Interface: Interface on which IPv6 DHCPv6 server is to be configured.
Lease Range: Range of IP addresses that the DHCPv6 server should allocate to the clients.
- Range Start: Start of lease IP range.
- Range End: End of lease IP range.
Preferred Time: Length of time that a valid address is in the preferred state and can be used without any restrictions. When the preferred-time expires, the address becomes deprecated. A deprecated address should not be used for new communications, but might continue to be used for existing communications in certain cases.
Note: If the valid-time is also configured, the preferred-time must be less than the valid-time. The preferred-time and the maximum-lease-time are mutually exclusive and cannot both be configured.
DNS (Optional): IPv6 address of the DNS server that the clients should use to resolve domain names.
- Primary DNS (Optional): Primary DNS.
- Secondary DNS (Optional): Secondary DNS.
Note: Once your changes are done, you need to start DHCP Service from Configuration -> DHCP Server -> Start DHCP Service to reflect the changes.

You have successfully configured DHCP IPv4/ IPv6 server on your firewall.
Attached Files:
How_to_configure_DHCP_server_on_your_firewall.pdf