How to configure port forwarding or DNAT on Gajshield Firewall
Video tutorial
Port forwarding or Destination Network Address Translation (DNAT) with GajShield firewall involves configuring the firewall to redirect incoming network traffic destined for a specific port on the firewall's external interface to a designated internal server or device. This process enables external users to access services hosted on internal servers behind the firewall, such as web servers or email servers, by forwarding traffic from a specific port on the firewall to the corresponding port on the internal server. DNAT is a fundamental feature of GajShield firewalls, facilitating efficient management of network traffic and seamless access to internal services from external networks.
In this document, we are going to guide you through with the port forwarding configuration using the port forwarding tab.
You can find the port forwarding tab under Firewall -> Policies -> Port Forwarding To configure port forwarding, follow these steps below:
- Go to Firewall -> Policies -> Port Forwarding and click on
 icon.
icon.
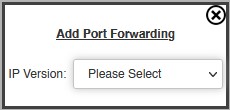
- Select the IP version to proceed with to add port forwarding for.

- The following screen appears:

The following information is required to add IPv4/IPv6 Port Forwarding:
- External IP: This field specifies the IPv4/IPv6 address on which external users will access the local LAN/DMZ server.
- Internal IP: This field specifies the IPv4/IPv6 address of the server present in the LAN/DMZ network.
- Service: You can select the appropriate service/service group based on the ports required to allow access of that particular server.
- Service NAT (Optional): This field is optional. You can do the port NAT to map external service (port) selected above for external users to service NAT port on which local LAN/DMZ server listens.
- Description Name (Optional) : This field is optional. You can provide a description for newly created port forwarding policy here if required.
- Enable LoopBack NAT Option : If you want to access the device in the LAN network from the same LAN network using external IP, then click on this button. As shown below.

- Local Network Interface (From which LoopBack NAT needs to be enabled): Select the interface on which the server is connected.
After creating port forwarding rule, you can see the screen as shown below:


After adding Port Forwarding policy, click on install policy (Firewall -> Policies -> Install Policies) to apply port forwarding policy.
You have successfully configured Port Forwarding using the port forwarding tab.
Attached Files:
How_toconfigure_port_forwarding_using_the_port_forwarding_tab.pdf